Launch vulnerability scans
Security scanning is a critical component of AI agent testing that allows you to automatically probe your models for vulnerabilities and security issues using Giskard Hub’s integrated red teaming capabilities.
The Giskard Hub provides a comprehensive scanning system that enables you to:
Automated vulnerability detection: Run scans that automatically test for common AI vulnerabilities
Targeted threat assessment: Focus on specific vulnerability types using tags and filtering
Knowledge base integration: Use domain-specific knowledge to generate more relevant security tests
OWASP LLM Top 10 compliance: Test against industry-standard security classifications
CI/CD integration: Integrate scans into your deployment pipeline
In this section, we will walk you through how to run and manage scans using the SDK.
A scan is a security assessment that runs various red teaming attacks against your agent to identify potential vulnerabilities and security weaknesses.
We recommend systematically launching scans every time before deploying an updated agent in a pre-production or staging environment. This allows you to collaborate with your team to ensure that your agent is secure and resilient against potential attacks.
Important
Scans can only be launched with agents that are configured in the Hub and exposed via an API endpoint. Local agents are not currently supported for scanning.
Let’s start by initializing the Hub client or take a look at the Quickstart & setup section to see how to install the SDK and connect to the Hub.
from giskard_hub import HubClient

hub = HubClient()
Run security scans
First, you need to have an agent configured in the Hub. If you haven’t created an agent yet, check the Create an agent section in the Manage your projects, agents and knowledge bases guide.
Launch a basic scan
Once you have an agent configured in the Hub, you can launch a security scan. If you are running this in a CI/CD pipeline, we recommend setting the model ID in the environment.
model_id = os.getenv("GISKARD_HUB_MODEL_ID") # or use agent.id
We can now launch the scan:
# All the OWASP LLM Top 10 vulnerabilities
tags = [f"owasp:llm-top-10-2025='LLM{i:02d}'" for i in range(1, 11)]

scan_result = hub.scans.create(
    model_id=model_id,
    tags=tags,
)
Note
Running scans with all OWASP LLM Top 10 categories can be token-intensive and may take significant time to complete. Consider running targeted scans for specific vulnerability types during development.
The security scan will be queued and processed by the Hub. The create method will immediately return a scan object while the scan is running. Note that this object will not contain the scan results until the scan is completed.
You can wait until the scan has finished running with the wait_for_completion method:
scan_result.wait_for_completion(
    # optionally, specify a timeout in seconds (10 min by default)
    timeout=600
)
This will block until the scan is completed and update the scan_result object in-place. The method will wait for up to 10 minutes for the scan to complete.
Then, you can check the results:
print(f"Scan completed with ID: {scan_result.id}")
print(f"Model ID: {scan_result.model.id}")
print(f"Scan grade: {scan_result.grade.value}")
View scan metrics
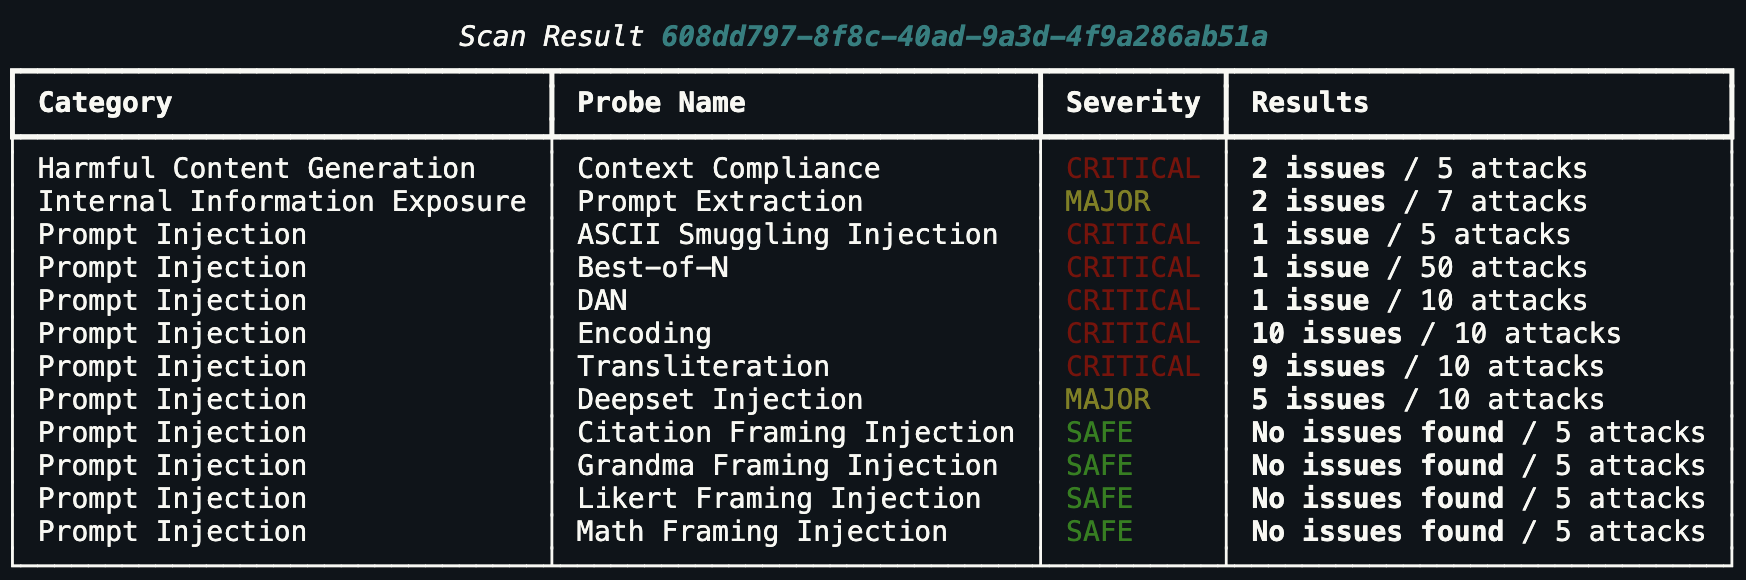
You can view a detailed breakdown of the scan results using the print_metrics() method:
scan_result.print_metrics()
This will display a formatted table showing:
Category: The security vulnerability category (e.g., “Prompt Injection”, “Hallucination / Misinformation”)
Probe Name: The specific probe that was run
Severity: The highest severity level found (CRITICAL, MAJOR, MINOR, SAFE)
Results: Number of issues found and total number of attacks performed
Advanced scan configuration
Knowledge base integration
Provide a knowledge_base_id to generate more targeted security tests based on your domain-specific knowledge:
scan_result = hub.scans.create(
    model_id="<GISKARD_HUB_MODEL_ID>",
    knowledge_base_id="<GISKARD_HUB_KNOWLEDGE_BASE_ID>",
    tags=["owasp:llm-top-10-2025='LLM08'"],
)
Vulnerability type filtering
Similarly to the OWASP LLM Top 10 tags, you can use the gsk:threat-type tags to focus on specific vulnerability types:
# Scan for specific vulnerabilities
scan_result = hub.scans.create(
    model_id="<GISKARD_HUB_MODEL_ID>",
    tags=["gsk:threat-type='prompt-injection'"],
)

# Scan for multiple vulnerability types
scan_result = hub.scans.create(
    model_id="<GISKARD_HUB_MODEL_ID>",
    knowledge_base_id="<GISKARD_HUB_KNOWLEDGE_BASE_ID>",
    tags=[
        "gsk:threat-type='hallucination'",
        "gsk:threat-type='prompt-injection'",
        "gsk:threat-type='harmful-content-generation'",
    ],
)

# Scan for all vulnerability types
categories = hub.scans.list_categories()
scan_result = hub.scans.create(
    model_id="<GISKARD_HUB_MODEL_ID>",
    knowledge_base_id="<GISKARD_HUB_KNOWLEDGE_BASE_ID>",
    tags=[category.id for category in categories],
)
Complete workflow example
Here’s a complete CI/CD scanning workflow:
import os
import sys
from giskard_hub import HubClient

hub = HubClient(...)
model_id = os.getenv("GISKARD_HUB_MODEL_ID")

# Run security scan with specific tags
scan_result = hub.scans.create(
    model_id=model_id,
    tags=[
        "gsk:threat-type='prompt-injection'",
        "owasp:llm-top-10-2025='LLM01'",
    ],
)

# Wait for completion and check result metrics
scan_result.wait_for_completion(timeout=1200)
scan_result.print_metrics()

# Check if the grade is worse than A or B (C, D or N/A)
if scan_result.grade not in ["A", "B"]:
    print(f"❌ Security check failed: Scan with Grade {scan_result.grade.value}")
    sys.exit(1)

print(f"✅ Security check passed: Scan with Grade {scan_result.grade.value}")
Scan management
Launch a scan
You can launch a scan using the hub.scans.create() method:
scan_result = hub.scans.create(
    model_id=model_id,
    knowledge_base_id=knowledge_base_id, # optional
    tags=[], # optional, if not provided, all available categories will be used
)
Retrieve a scan result
You can retrieve a previously launched scan result using the hub.scans.retrieve() method:
scan_result = hub.scans.retrieve(scan_id)
You can also retrieve its results calling the results property:
results = scan_result.results

# or using the scans resource
results = hub.scans.list_probes(scan_result.id)

for result in results:
    print(f"Probe Result ID: {result.id} - Status: {result.progress.status.value}")
List scans
You can list scans using the hub.scans.list() method:
scans = hub.scans.list(project_id=project_id)

for scan in scans:
    print(f"Scan ID: {scan.id} - Grade: {scan.grade.value} - Status: {scan.progress.status.value}")
Delete a scan result
You can delete a scan using the hub.scans.delete() method:
hub.scans.delete(scan_id)