🗣️ NLP model scan
The Giskard python library provides an automatic scan functionality designed to automatically detect potential vulnerabilities affecting your ML model. It enables you to proactively identify and address key issues to ensure the reliability, fairness, and robustness of your Machine Learning models.
Step 1: Wrap your dataset
To scan your model, start by wrapping your dataset. This should be a validation or test set in Pandas format.
⚠️ Warning
It’s highly recommended that you wrap your data before preprocessing so that you can easily interpret the scan results. If you’re unable to (because your prediction function can’t integrate your data preprocessing steps), we recommend you add columns that are not features of your model as metadata to your dataset. This provides better scan results.
# Wrap your Pandas DataFrame with Giskard.Dataset (validation or test set)
giskard_dataset = giskard.Dataset(
    df=df,  # A pandas.DataFrame containing raw data (before pre-processing) and including ground truth variable.
    target="label",  # Ground truth variable
    name="Tweets with sentiment", # Optional: Give a name to your dataset
)
For further examples, check out the tutorials section.
Click to view parameter details
Mandatory parametersdf: Apandas.DataFramecontaining raw data (before pre-processing) and including ground truth variable. Extra columns not included as features of the model can remain indf.
Optional parameterstarget: The column name indfcorresponding to the ground truth variable.name: Give a name to your dataset.cat_columns: List of strings representing names of categorical columns.Can be binary, numerical, or textual with a few unique values. If not provided, column types will be inferred automatically.column_types: Dictionary of column names and their types (numeric, category or text) for all columns ofdf. If not provided, column types will be inferred automatically.
Step 2: Wrap your model
Next, wrap your model. You can wrap either the prediction function (recommended) or model object, as shown here:
Wrapping your model through the prediction function is the preferred method. The prediction function is any Python function that takes as input a raw Pandas dataframe, pre-processes your data and returns the predictions.
Some important conditions:
prediction_functionencapsulates all the data pre-processing steps (categorical encoding, numerical scaling, etc.).prediction_function(df[feature_names])does not return an error message.
def prediction_function(df):
    preprocessed_df = demo_data_processing_function(df) # The pre-processor can be a pipeline of one-hot encoding, imputer, scaler, etc.
    return demo_classification_model.predict_proba(preprocessed_df)

giskard_model = giskard.Model(
    model=prediction_function,
    model_type="classification",
    classification_labels=demo_classification_model.classes_,  # The order MUST be identical to the prediction_function's output order
    feature_names=[TEXT_COLUMN],  # Default: all columns of your dataset
    name="Tweets sentiment classification", # Optional: give it a name to identify it in metadata
    # classification_threshold=0.5, # Optional: Default: 0.5
)
For further examples, check out the tutorials section.
Click to view parameter details
Mandatory parametersmodel: A prediction function that takes apandas.DataFrameas input and returns an array (\(n\times m\)) of probabilities corresponding to \(n\) data entries (rows ofpandas.DataFrame) and \(m\)classification_labels. In the case of binary classification, an array (\(n\times 1\)) of probabilities is also accepted.model_type: The type of model, eitherregression,classificationortext_generation.classification_labels: The list of unique categories for your dataset’s target variable. Ifclassification_labelsis a list of \(m\) elements, make sure that:prediction_functionis returning a (\(n\times m\)) array of probabilities andclassification_labelshave the same order as the output ofprediction_function.
Optional parametersname: Give a name to the wrapped model to identify it in metadata.feature_names: An optional list of the column names of your feature. By default,feature_namesare all the columns in your dataset. Make sure these features are all present and in the same order as they are in your training dataset.classification_threshold: Model threshold for binary classification problems.
Wrapping a model object allows Giskard to automatically infer the ML library of your model
object and provide a suitable serialization method (provided by save_model and load_model methods).
Some important conditions:
There will be an override of the
model_predictmethod which should take as input the raw pandas dataframe and return the probabilities for each classification labels (classification).The pre-defined serialization and prediction methods cover the
sklearn,catboost,pytorch,tensorflow,huggingfaceandlangchainlibraries. If none of these libraries are detected,cloudpickleis used as the default for serialization. If this fails, we will ask you to also override thesave_modelandload_modelmethods where you provide your own serialization of themodelobject.
class MyCustomModel(giskard.Model):
    def model_predict(self, df):
        preprocessed_df = demo_data_processing_function(df)
        return self.model.predict_proba(preprocessed_df)

giskard_model = MyCustomModel(
    model=demo_classification_model,
    model_type="classification",
    classification_labels=demo_classification_model.classes_,  # Their order MUST be identical to the prediction_function's output order
    feature_names=[TEXT_COLUMN],  # Default: all columns of your dataset
    name="Tweets sentiment classification", # Optional: give it a name to identify it in metadata
    # classification_threshold=0.5, # Optional: Default: 0.5
    # model_postprocessing_function=None, # Optional
    # **kwargs # Additional model-specific arguments
)
For further examples, check out the tutorials section.
Click to view parameter details
Mandatory parametersmodel: Any model fromsklearn,catboost,pytorch,tensorflow,huggingface(check the tutorials). If none of these libraries apply to you, we try to serialize your model withcloudpickle. If that also does not work, we ask you to provide us with your own serialization method.model_type: The type of model, eitherregression,classificationortext_generation.classification_labels: The list of unique categories for your dataset’s target variable. Ifclassification_labelsis a list of \(m\) elements, make sure thatprediction_functionis returning a (\(n\times m\)) array of probabilities andclassification_labelshave the same order as the output of the prediction function.
Optional parametersname: Give a name to the wrapped model to identify it in metadata.feature_names: An optional list of the column names of your feature. By default,feature_namesare all the columns in your dataset.classification_threshold: Model threshold for binary classification problems.data_preprocessing_function: A function that takes apandas.DataFrameas raw input, applies pre-processing and returns any object that could be directly fed tomodel.model_postprocessing_function: A function that takes amodeloutput as input, applies post-processing and returns an object of the same type and shape as themodeloutput.**kwargs: Additional model-specific arguments ( See Models).
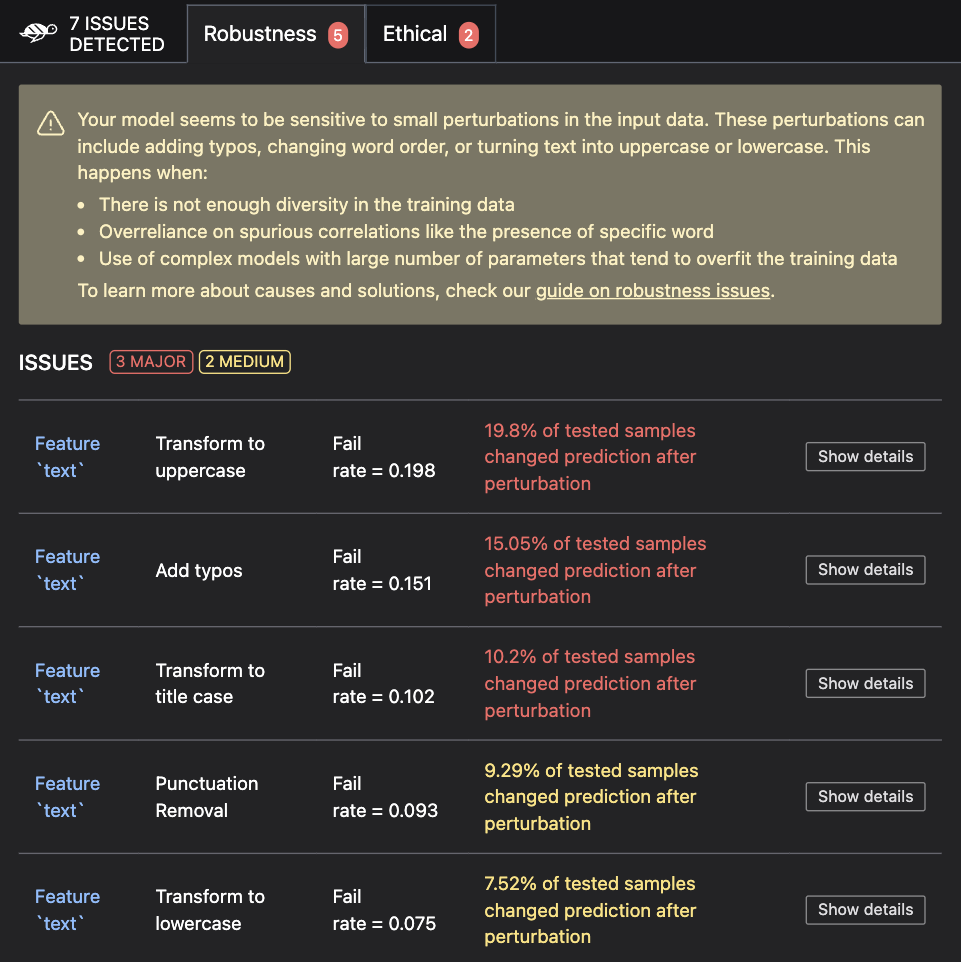
Step 3: Scan your model
Now you can scan your model and display your scan report:
scan_results = giskard.scan(giskard_model, giskard_dataset)
display(scan_results)  # in your notebook
If you are not working in a notebook or want to save the results for later, you can save them to an HTML file like this:
scan_results.to_html("model_scan_results.html")
💡 Customize your scan
Check our Advanced scan usage page, if you want to:
Scan with only some specific detectors
Make the scan faster
What’s next?
Your scan results may have highlighted important vulnerabilities. There are 2 important actions you can take next:
1. Generate a test suite from your scan results to:
Turn the issues you found into actionable tests that you can directly integrate in your CI/CD pipeline
test_suite = scan_results.generate_test_suite("My first test suite")

# You can run the test suite locally to verify that it reproduces the issues
test_suite.run()
Jump to the test customization and test integration sections to find out everything you can do with test suites.
2. Upload your test suite to the Giskard Hub to:
Debug your tests to diagnose the identified issues
Compare the quality of different models to decide which one to promote
Create more domain-specific tests relevant to your use case
Share results, and collaborate with your team to integrate business feedback
To upload your test suite, you must have created a project on Giskard Hub and instantiated a Giskard Python client.
Then, upload your test suite like this:
test_suite.upload(giskard_client, project_key)
Here’s a demo of the Giskard Hub in action.
Troubleshooting
If you encounter any issues, join our Discord community and ask questions in our #support channel.